
For almost two years, our small guest-room office felt permanently messy no matter how often we cleaned it. After finally reorganizing Mark’s tiny desk setup, I realized the problem wasn’t the desk size it was the lack of systems. In this guide, I’m sharing the simple desk organization ideas, storage fixes, and small-space tricks that helped turn a cluttered corner into a workspace that actually feels calm and functional.

What You’ll Need
- Drawer organizer inserts or a shallow tray (under $15)
- Cable management clips or velcro ties (around $8–12)
- One monitor riser or a monitor arm (budget varies widely $20 to $130)
- A small wall-mounted shelf or pegboard section (optional but helpful)
- Label maker or masking tape plus a marker
- Command strips (large size for hooks, medium for cord clips)
- Stackable letter trays if paper is your nemesis (around $12 for a set)
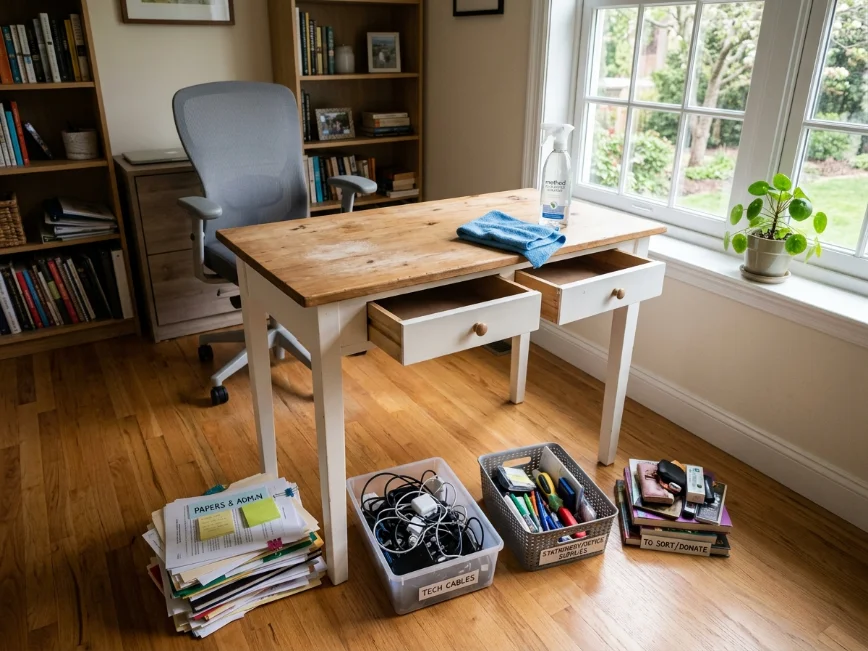
Step 1: Clear Everything Off and Start From Zero
This sounds obvious, but it’s the step most people skip. Pushing things around doesn’t count as organizing it just moves the mess. Pull everything off the desk surface. Everything. Then wipe it down.
Once it’s clear, resist the urge to immediately start putting things back. Sit in the chair, look at the empty surface, and ask yourself what actually needs to be within reach. For Mark’s desk, that was the monitor, the keyboard, a notepad, a pen, and his water bottle. That’s it. Everything else was “in case I need it” clutter.
The stuff that ended up back on the desk included the monitor, keyboard, one pen in a small cup, and a notepad. The stuff that got relocated included a full cup of pens moved to a drawer, a stapler moved to a shelf, a stack of papers moved elsewhere, and about 40% of what was there that turned out to be literal trash.
What went wrong here: I sorted everything into “keep” and “relocate” piles on the floor. Then both kids came in, the dog got interested in the paper pile, and things got chaotic. Do this when the house is quiet or close the door.
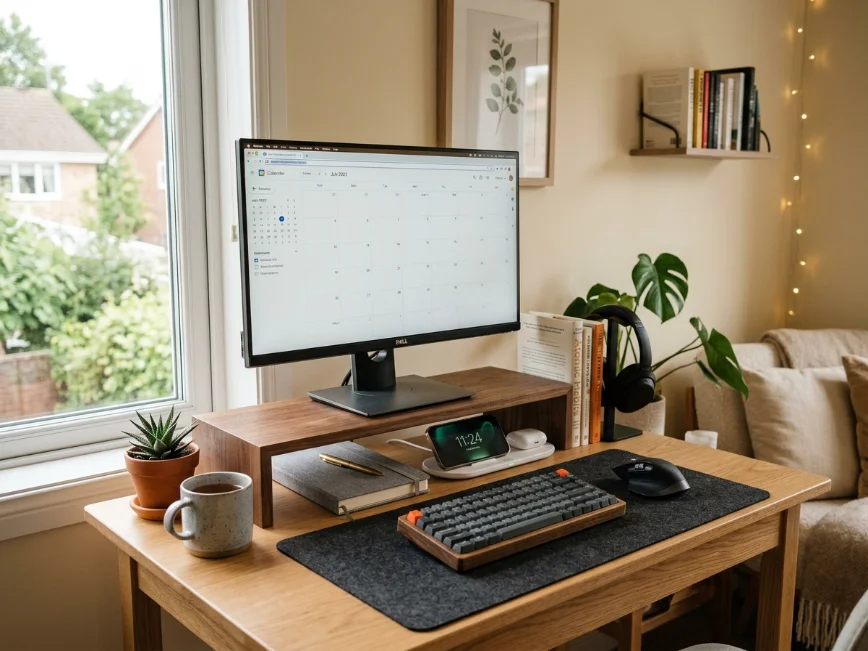
Step 2: Raise the Monitor to Free Up the Surface
On a small desk, vertical space is your only real option for expansion. The single biggest change we made was getting a monitor riser a simple wooden one from Amazon for around $28. Raising the monitor about four inches freed up the entire footprint underneath, which became the home for Mark’s small notebook, a wireless charging pad, and his headset when it’s not in use.
If the Budget Allows, Consider a Monitor Arm
A monitor arm mounts to the back edge of the desk and holds the monitor in the air entirely, freeing up all the space that used to sit underneath. The one we eventually upgraded to — about $65 from Amazon and VESA-compatible made the biggest visual difference of anything we did. The desk looks almost empty now, which is the goal.
Budget alternative: if you can’t swing either of those right now, even a thick hardcover book stack raises a monitor by a few inches. Not pretty, but effective while you figure out the rest.
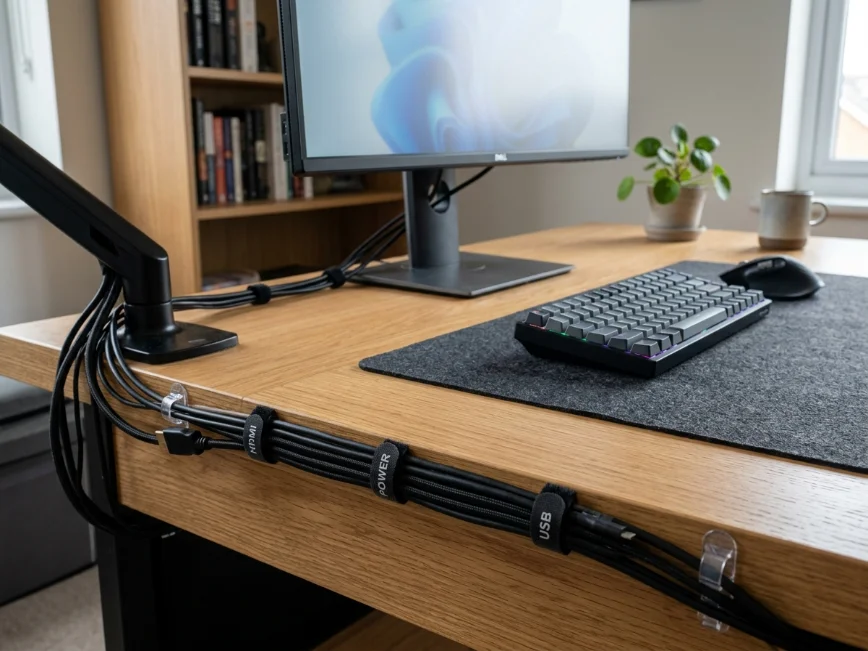
Step 3: Deal With the Cables Immediately
Loose cables on a small desk make the whole thing feel chaotic even when it’s technically organized. This is the step I ignored the longest because it felt tedious, and it was a mistake.
The fix wasn’t complicated. A $9 pack of velcro cable ties from Home Depot bundled everything behind the monitor. Command adhesive clips around $6 at Target routed the power strip cord along the back edge of the desk so it dropped straight down rather than snaking across the surface. The power strip itself got mounted to the underside of the desk with two large Command strips. This sounds fancier than it is and took about four minutes.
What went wrong here: the first set of Command strips I used weren’t rated for the weight, and the power strip came down at 2 a.m., which was a fun time. Check the weight rating on the package and buy the heavy-duty version.
Cable management isn’t exciting, but nothing undermines the look of an organized desk faster than a nest of cords. It’s worth the hour.
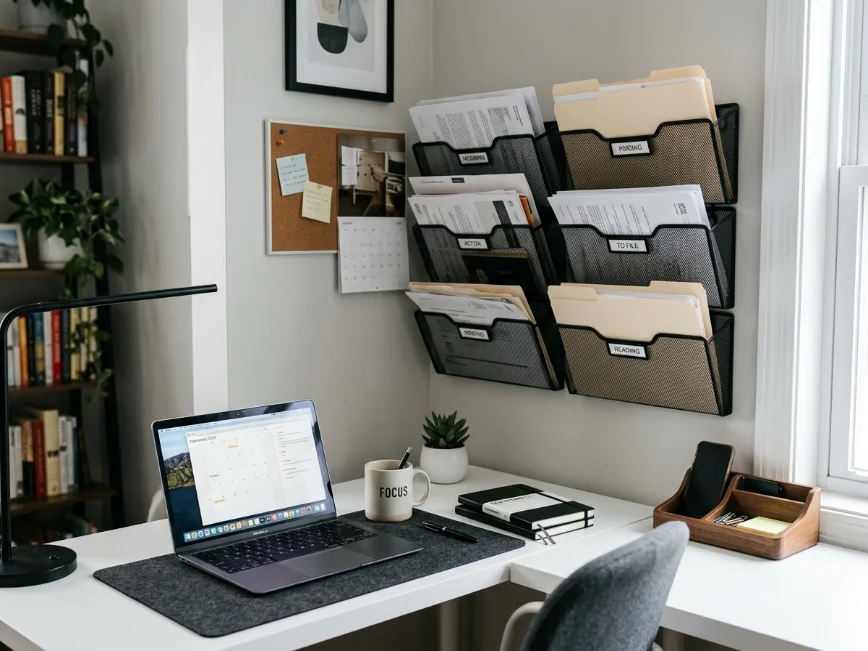
Step 4: Assign a Home for Paper
Paper is the enemy of small desks. It stacks, it spreads, and it multiplies when you’re not looking. After the North Carolina spring pollen season last year, Mark’s desk had somehow accumulated three months of papers that included an old car insurance card, a birthday card from his mom, and a grocery list from February. None of it needed to be on the desk.
The solution that actually worked for us was a two-tier stackable letter tray mounted on the wall to the left of the desk, installed with Command picture-hanging strips. It cost about $14 from Target. One tier became “action needed” and the other became “file later.” Both are emptied every Sunday.
If your desk is against a wall with no room to mount things, a single slim letter tray sitting on the corner of the desk surface works too. Just commit to a weekly clear-out. The tray itself isn’t the solution the habit is.
What About Notebooks and Sticky Notes?
One notebook on the desk, maximum. Everything else goes in a drawer. Sticky notes are fine, but they shouldn’t live stuck to the monitor bezel like a mosaic. One section of the desk edge or a small corkboard strip if you have wall space keeps notes visible without spreading.
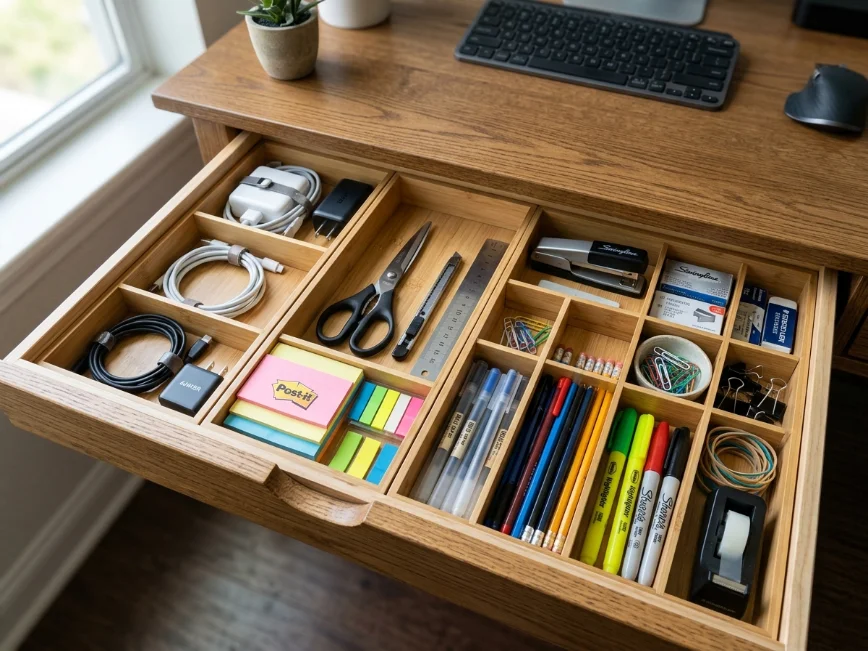
Step 5: Organize the Drawer Like It Actually Matters
Most people treat desk drawers like a catch-all and then wonder why they spend five minutes finding a pen every time they need one. A shallow drawer organizer the kind that costs around $10–14 at Target or Ikea divides the drawer into sections. Pens in one spot. Sticky notes in another. Charger cables coiled in a third section. Scissors and tape in the back.
What I did: bought a set of bamboo drawer dividers from Amazon for around $16 and cut them to fit the drawer width. It took twenty minutes, looked good, and held up fine. The Ikea Skadis pegboard drawer tray is another option if you’re already using their desk system.
The goal is that every single thing in the drawer has an assigned spot, so putting things away takes no thought. When it takes no thought, you actually do it.
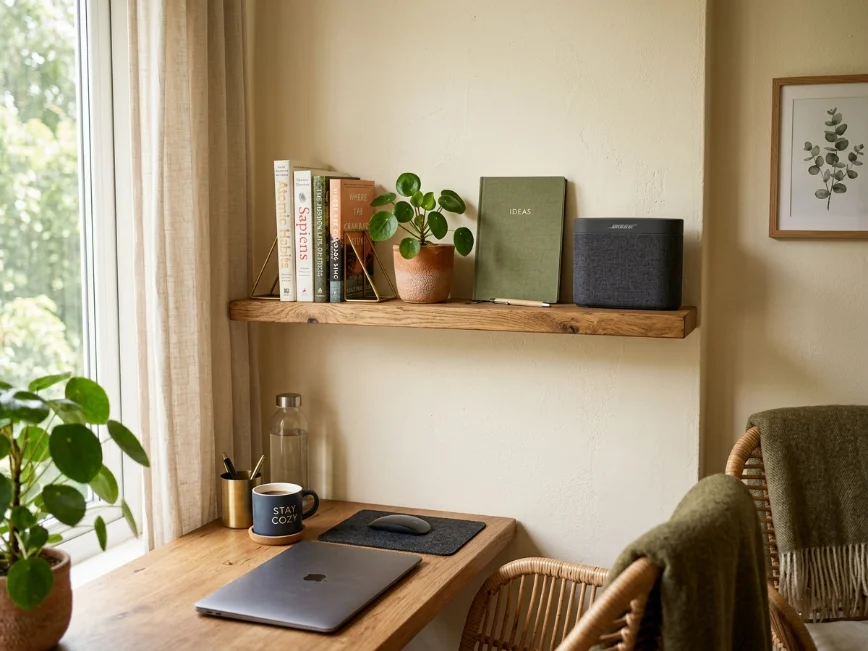
Step 6: Add Vertical Storage Only Where It Fits
Small desks fail when people try to put too much on them. But adding a small floating shelf directly above the desk around six to eight inches above monitor height can hold reference books, a small plant, or a few items you need visible but not constantly within reach.
We put up a simple 24-inch shelf from Home Depot around $18 for the shelf and $12 for the brackets and it took one afternoon plus a second trip back for longer anchor screws. The shelf now holds a small plant, Mark’s reference notebook, and a Bluetooth speaker. It keeps those things off the desk surface without losing them entirely.
If you’re renting and can’t put holes in the wall, a freestanding desktop shelf organizer sometimes called a desk hutch or monitor shelf with a second tier does the same job without the drilling.
Common Pitfalls
Buying Storage Before Clearing the Clutter
New bins and trays don’t solve a clutter problem. They just give clutter nicer housing. Always do step one first.
Over-Organizing and Abandoning It
If the system requires fifteen steps to put something away, you won’t use it. The best desk organization system is the one that’s fast enough to maintain while distracted.
Ignoring Lighting
A small desk with bad lighting feels cramped and chaotic even when it’s tidy. A small desk lamp we picked one up at HomeGoods for around $22 changed the whole mood of that corner. It also helped Mark stop squinting at the screen during evening calls.
Buying a Bigger Desk as the First Solution
Sometimes the desk really is too small and needs to go. But in most cases, the problem is the volume of stuff, not the amount of desk space available.

Final Thoughts
What surprised me most is that organizing a small desk wasn’t really about buying more storage. It was about reducing friction. Once everything had a place and the surface stayed mostly clear, Mark actually kept it clean without being reminded every other day.
And honestly, the room feels bigger now even though we didn’t add a single square foot.
